ViewChild 這個屬性在 Angular 是屬於很常用的一部份
今天就來了解一下 ViewChild 與 ViewChildren 的差別與使用方式吧!
先做一個子組件
HelloComponent 子組件
import { Component, Input } from '@angular/core';

@Component({
  selector: 'hello',
  template: `<h1>Hello {{ name }}!</h1>`,
  styles: [
    `
      h1 {
        font-family: Lato;
      }
    `,
  ],
})
export class HelloComponent {
  @Input() name: string;
}
ViewChild
屬性裝飾器,用於配置一個檢視查詢。 變更檢測器會在檢視的 DOM 中查詢能匹配上該選擇器的第一個元素或指令。 如果檢視的 DOM 發生了變化,出現了匹配該選擇器的新的子節點,該屬性就會被更新。 它支援 Type 類型或 string 類型的選擇器,同時支持設置 read 查詢條件,以獲取不同類型的實例。比如 ElementRef 和 ViewContainerRef.
父組件
<hello #hello name="{{ name }}"></hello>import { AfterViewInit, Component, VERSION, ViewChild } from '@angular/core';
import { HelloComponent } from './hello.component';
@Component({
selector: 'my-app',
templateUrl: './app.component.html',
styleUrls: ['./app.component.css'],
})
export class AppComponent implements AfterViewInit {
name = 'Angular ' + VERSION.major;
@ViewChild('hello') helloElement: HelloComponent;
ngAfterViewInit() {
// child is set
console.log('helloElement', this.helloElement);
}
}
console 出來可以直接取到子組件裡的變數
ViewChildren
用於配置檢視查詢的引數裝飾器。
父組件
<ng-container *ngFor="let item of arrName">
  <hello #item [name]="item"></hello>
</ng-container>
import { AfterViewInit, Component, VERSION, ViewChild } from '@angular/core';
import { HelloComponent } from './hello.component';
@Component({
selector: 'my-app',
templateUrl: './app.component.html',
styleUrls: ['./app.component.css'],
})
export class AppComponent implements AfterViewInit {
arrName = ['aa', 'bb', 'cc'];
@ViewChildren('item') itemElement: QueryList<HelloComponent>;
ngAfterViewInit() {
this.itemElement.map((e) => {
console.log('itemElement', e.name); // 依序提出子組件裡的值
});
}
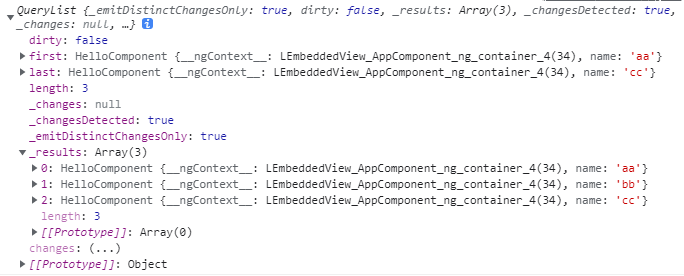
}此為 console this.itemElement 的畫面

注意:
ViewChildren 一定要搭配 QueryList 一起使用,不然就不能實現列表更新這件事了
因生命週期關係 ViewChild 與 ViewChildren 要在 ngAfterViewInit 裡才能實現
範例:https://stackblitz.com/edit/angular-ivy-cdn6fp
參考資料: ViewChild ViewChildren